Tuesday, December 31, 2013

Happy New Year to Everyone!

 
Happy New Year, everyone!!  2013 vanished before our eyes and now another year is standing in the wings, waiting for us to fill it with energy, enthusiasm, and memory-making events.  So how did you end 2013?  Did you accomplish your goals?  Did you do all you could to make each day wonderful?  I hope so.  December, for me, was filled with tons of family activities; I hardly had time to quilt.  I did manage to take my 6-year old grand daughter aside to finish a quilt she started.  She chose the fabrics and cut them (with much careful oversight from me!) into rectangles with a rotary cutter - and then sewed them together on my Bernina (again, with much careful oversight from me...).  The week before Christmas, I showed her how to use my Gammill - and SHE quilted her quilt!  Yes, I did the loading and the threading and put the needle where it needed to go before the machine started moving, but SHE did it!  Here is little Daisy's polka dot quilt.  
 
 
It is exactly what every 6-year old, almost 7, needs to curl up with on a cold wintry day... but she decided she also needed a little pillow... and so, together, we made one with the leftover rectangles:

 
Not every child wants to learn to sew - but Daisy is intent on doing anything I do... whether I am ready for her to do it or not!  Here she is, standing on a stool in her striped socks, so that she could see her quilt on the other side, learning to quilt on the longarm.  How cool is that?!

 
Daisy has always been intimidated by my machine -- until I showed her the Gammill circle-maker -- all she had to do was put a stylus in a circle (of the size she wanted), and move the machine along the template until the stitching around each circle was complete.  It gave her the freedom to stitch without fear.  I think many of us have some of that anxiety when we are learning something new.  Below is the circle maker -- and you can see it above, with the stylus guided by Daisy's hands.  Teaching people of all ages to quilt is so rewarding to me.

 
Here is the back of Daisy's quilt; she chose a plush white minkee for the backing.  It makes for such a soft, cuddly quilt.

 
I thought I'd share some thoughts this month about how I develop patterns.  There are tons of ways... but maybe some of my ideas might spark an idea for you. 

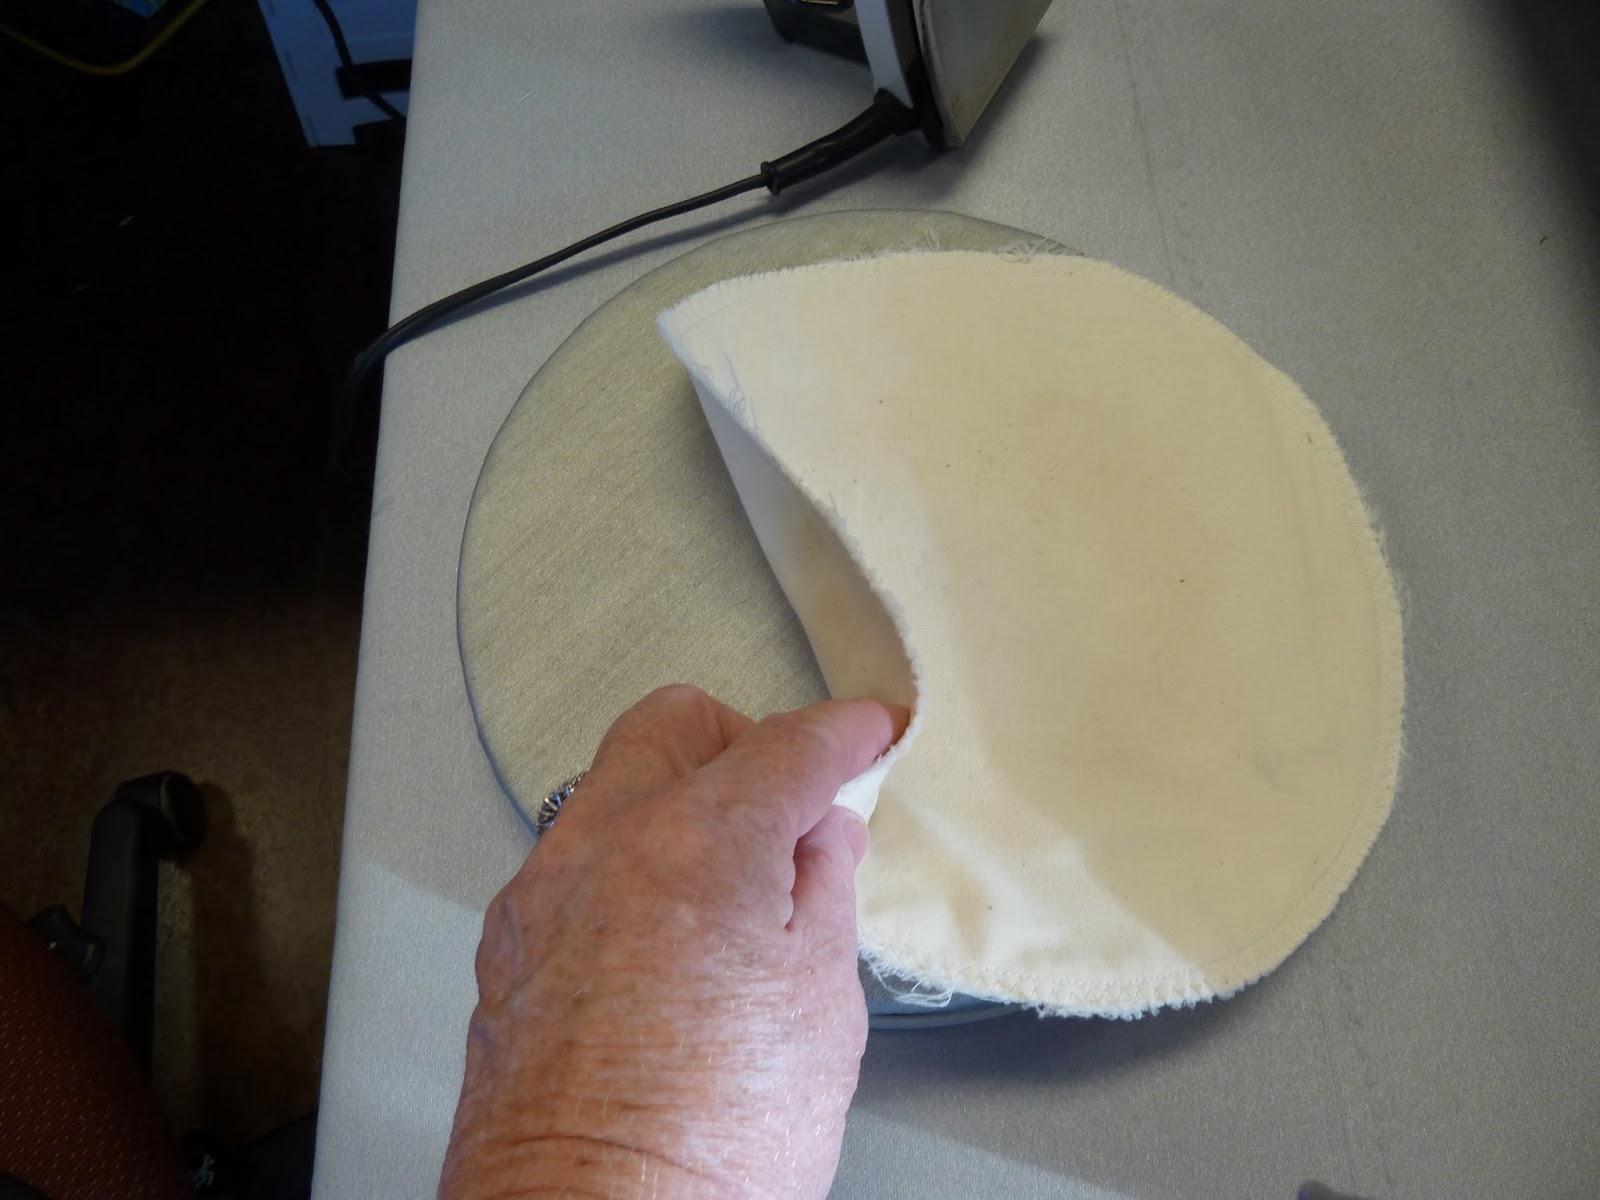
At a retreat in Athens a couple of months ago, a quilter named Sandy showed me a picture of an antique block and asked how she could replicate the block.  I got excited by the block picture -- I didn't recognize it at the time, but it is one that is called Georgetown Circle.  I'll show you the block in a minute... but briefly, it has a Lemoyne Star in the center, concentric circles divided into 16 sub-units, and a ring of dogtooth points on the outside of the circles.  Sandy may have thought I was nuts when I said, "Cool!  Let's draw it out -- it should be easy.  First, we need something to make circles, though!"  We headed for the retreat kitchen and retrieved bowls, plates, pans, lids... anything that gave us a variation in circle sizes.  Plates and small bowls are great for drawing circles - but sometimes it is hard to find the right size.  Here are a few from my own kitchen; I find that hunting down the perfect circle often becomes a great treasure hunt (okay - so I'm weird...)!


When plates and small bowls don't give you the right size (remember - to fill a 12-inch block, you often need something larger than a dinner plate!), try for large mixing bowls and pan lids.  Sometimes pans work, but if you want to use the pan as a template for drawing a circle... that darn pan handle can be a nuisance.

 
Once Sandy and I had the right sizes for the circles, it was just a matter of drawing them up on freezer paper, drawing intersecting lines across them, much of just by "eyeballing" the middle... and suddenly there was a pattern that could be used as a paper foundation for making a Georgetown Circle block.  Sandy went home... made her block... and just sent me a photo it:  she did a wonderful job making it -- I can't wait to see the finished quilt some day.


What is funny about this block and the pattern... is that once I drew the pattern, I was enamored with the block... and I started seeing it everywhere.  The day after I drew it, Sandy and I saw a drawing of it in a booklet we saw when we went over to see a local guild's quilt show in Canton, Texas.  I came home from that weekend and I saw the block in Barbara Brackman's Encyclopedia of Pieced Quilt Patterns book.  Next, I saw that Di Ford had made a quilt with the block in her Primarily Quilts book.  And what is even funnier... is that later in the week, I decided to start cleaning up my "quilt storage" room; lo and behold, my very own Georgetown Circle block appeared before my eyes!  Here's a close-up...

 
Is this serendipity or what?!!  I had bought the quilt with these blocks in it at a guild auction a dozen years ago because it was so crazy-looking; I called the quilt my "Funky Wheels" quilt.  It is still just as quirky and crazy as the day I first saw it, and someday I hope to make a replica (though I will definitely make different fabric choices!).  Isn't it grand?!  Okay - maybe it's not everyone's favorite, but I sure like it!
 
 
So... life is full of fun and surprises, isn't it?  Speaking of which... I got a fun email from someone this past week.  It cracked me up: 

"Setting the scene:
No kids, no visitors, so sleeping in on Christmas morning.
At 8:00 a.m., someone rings the doorbell.  Oh, there is going to be heck to pay if hubby's sister is standing on my doorstep.  Look out; no one there.  Look down - a USPS Priority box on the porch and he brought up the newspaper too!  Thought you would like to hear something GOOD about the post office!"

I had gotten an order for a pattern through my website... and rushed to the post office like a crazy lady so that it would arrive by Christmas.  And it did!!  Yes, life is full of surprises.  We like them when they make us happy!  And I love making people happy.  I had another customer who had ordered a block-of-the-month and I sent it out the day the order came in... but by the Saturday before Christmas, it had still not arrived, and it was intended as a gift from Mom to one of her quilting daughters.  Oh dear!  So... I packaged up a duplicate and shipped it off, overnight express, with the post office promising it would arrive the day before Christmas.  Bless those postal workers who were still at work late Saturday when I arrived at the post office... they got the package off and to its destination on time!  Mom and daughter were thrilled - and Mom said that they, along with another daughter, are taking a class from me at Common Threads in Waxahachie, Texas, this spring.  It's nice to make happy endings for people -- and nice to know it's easy to make friends.

Well, once I got my mind focused on that Georgetown Circle block, I couldn't get it out of my head.  but first... a few other quilts are waiting for me to give birth to them.  How do I begin, when I start a quilt?  First... I pull a stack of fabrics that I might want to use.  If I don't pull them, and just go hunt down the next piece, one at a time, it takes me twice as long.  I pull all the options and put them in a stack together, or a box, and that way, when I'm ready to choose a fabric, I go straight to the box and don't have to search through my whole closet for the next piece of fabric.  I knew I wanted to use soldier blue and cheddar in my quilt - with blue and white/off-white shirtings.  Here's my fabric selection -- first, the blues...


...then the gorgeous cheddars that add so much spark to a quilt...

 
And the shirtings that use blue in the design motifs - aren't they great?

 
My block of choice?  Really... it was a block that I drew up late one night because I didn't have a single bit of "take-along applique" to work on at a retreat.... you know, the kind of applique that you can throw in a little project bag and take along to a bee or the doctor's office.  Here are nine of the almost-finished blocks (and I just noticed that a circle fell off of the top left block!); I already know I'm going to call this quilt "Target Practice":

 
I drew this block up and fell in love with it -- it's simple, easy to make, and the variation of colors in it (even though there are only two - blue and cheddar - there are a variety of light through dark shades and prints) makes your eyes dance!  Here's a close-up of the block -- you can even see the loose threads because I haven't sewn down the circles yet.

 
How did I make all those "rick rack" V's and points?  Easy.  I made a template out of plastic, cut it out, and marked the pattern on the fabric using the template and a white-lead ceramic pencil on the dark fabrics....

 
...and a Pigma pen to mark the pattern on the lighter-colored fabrics.  These lines become my "turn-under" lines for needle-turn applique.  I just trim away all but a 1/8-inch seam allowance, clip the inside V's, baste it to the background fabric, and start stitching away.  And I do ALL of the blocks at once so that I can put the fabric away and have all the blocks ready to work on.  I wouldn't want to run out of applique projects, would I?

 
So... you might ask... what am I going to do with these blocks?  How am I going to set them?  Here's some insight into my thought process when I design.  At first, I thought that I'd just design borders to add, one at a time... but I decided that might not give me the result I wanted (meaning sometimes surprises aren't so wonderful!).  I went to my computer and cranked up Electric Quilt (EQ - a software program that can be used to create patterns for quilts)... it's an easy and intuitive program to use and I use it often when designing quilts.  It's not always that I want to use the blocks in EQ or that I even use any of the output (templates, patterns) -- it's just that with EQ, I can audition different blocks, different borders, and different sizes -- and I can figure out what size the "floaters" (unpieced filler borders that you insert so when you add a block border, it FITS) need to be; EQ is very handy in that respect.  The picture below is an early mockup of what I might do with those "Target Practice" blocks.  You will note that the blocks in the middle don't look like mine, above -- but they were the closest thing I could find in EQ to "mimic" the center of my quilt with its 9 blocks.  And what blocks are the ones that I used in my EQ mockup?  Amazingly enough... yes, they are the Georgetown Circle blocks!  It's so strange how that block keeps popping up! 

You'll notice that I have arranged two lines of a "rick rack" motif as inner borders -- I had decided that I wanted to do that to carry the rick-rack motif of the blocks out into the borders, with enough space between the two lines for a line of little 5/8-inch circles - again, to repeat the circle motifs used in the blocks, themselves.  I didn't draw the circles in the mockup (too much work!).  On the outside border, I have put outward-facing blocks -- these blocks will actually be Target Practice half-blocks when I make my quilt (I don't know why I didn't use the Georgetown Circle blocks here).  I thought adding these half-blocks would give the quilt a nice, cohesive look.  I left a big "open" border inside of the half-blocks because I like to leave places for some fancy quilting.  The quilting may not show up well against a shirting background... so that open border may fall by the wayside before I'm done.

 
That was an early option... then I had another thought.  What if I rotated the half-blocks and made them face inward?  I thought it would give the quilt a better "frame."  I did a mock-up using EQ, and changed the inner borders around a bit, too.  I did a bunch of different versions, and here is one of them:

 
I thought from the beginning that I would use 1/2-inch sashing strips between the center blocks; that size provides a nice balance with the narrow rick-rack motifs of the blocks, themselves.  But what if I changed that way of thinking?  What if I made 3-inch wide sashing strips out of that shirting fabric and had the blocks "float" in the quilt?  With the EQ program, you can always see the finished size of the quilt, and I wanted a method for making my quilt larger.  Using 3-inch instead of 1/2-inch sashing strips suddenly made the quilt quite a bit larger, which I really liked.  I moved the rick-rack border out... and made the half-blocks outward-facing once again.  I thought it was an improvement -- it gave the quilt more "room to stretch the eyes" in the quilt center.  Still, I felt like the quilt was a little small -- I like quilts that are bigger than 75 inches and smaller than 90 inches in size.  Quilts that are bigger than that are just hard to handle and hard to do much with (unless you have a specific bed you want to use them on), and smaller quilts are fine but there is less room to repeat the dominant motifs such that the quilt has a nice, cohesive look to it.  All of this information is a lead-in for saying... I decided I needed to add more borders to make my quilt a bit larger!  I tried several inside borders and several outside borders... and came up with this design, below.  It's got three-inch inner sashing strips, the rick-rack motifs (and I'll put tons of little circles in the space between them), outward facing stars... and a nice squares-on-point outer border. 

 
I think this is getting close to what I might end up doing... but I never know until I finish the quilt, exactly where it will take me!  Remember - the blocks in the mock-ups above are not the right blocks; I will be using my Target Practice blocks.  You have to use a bit of imagination to see it all!

In the meantime, I also found time (forced myself to find time, I should say!) to work on my third Baltimore Glory blocks -- this is going to be a new Baltimore album quilt, but it's going to be a bit different than my earlier quilts.  I'm doing TWO patterns - one will have on-point blocks and one will have straight-set blocks.  I have had a yearning to do an on-point Baltimore quilt for a while - and to keep all the on-point blocks "standing up" - that is, they won't be leaning to the left or right; that always throws me off when I see a quilt with vases and flowers leaning or upside down!  There is still a lot of work to be done with these two blocks - more applique, lots of embroidery, plenty of berries... and then I have to write the pattern for everything.  I NEED MORE HOURS IN THE DAY!

 
Here's the same block - sort of - re-designed as a straight-set block.

 
In cleaning up my sewing room, I also decided I needed another "take-along" project.  I have always wanted to make a crazy quilt - and quite a while back, I made fan blocks using dupioni silk on a shot cotton background.  I want to put different crazy-quilt embroidery along each blade of the fans - so now I have all the thread, blocks, needles, and sampler books packaged up to "take along" when I need something to work on.  Yay!

 
A couple of months ago, our guild invited a speaker to lecture on antique quilts.  She brought along quite a collection for a 2-hour workshop.  We didn't sew - she showed quilts and we all commented, oohed, and aahed...  here is one of the quilts she showed.  Isn't it delightful?

 
I like old quilts - particularly when they have something unusual about them.  I thought this one had a really interesting border -- I've never seen an outer border on this kind of quilt.

 
Here's another lovely old quilt - Ocean Waves.  Did you notice that on the lower right side, there is a block or set of blocks that are colored a bit differently than the others?  It has yellows and pinks in it.  I think that makes a quilt interesting. 

 
This quilt was made amazingly well.  I still catch my breath when I think about how quilters of 100 or more years ago had few of the tools and notions we have today.  These quilts were perfectly made without a single rotary cutter or fancy set of scissors and needles.  How did they do it?!  Look how perfect those points are!

 
The next quilt caught everyone's eyes because of the star blocks - can you see the "doves" in them?  Given the age of these quilts, their condition was amazing.  So what is unusual about this quilt?


First of all - look at that red block in the picture above.  Would you ever mix two different fabrics to finish a block just because you ran out of one of them?  It seems that it was a pretty common thing to do yesteryear.  The blue block also uses two different blue fabrics - though at least their use is symmetrical.  Interesting, isn't it?  But what was really interesting about this quilt?  Take a look at the picture below and look at the bottom border.  Do you think the maker just couldn't bear to not use all the blocks she'd made, so she loaded up one side with her extras?  Or do you think she started out thinking she would make a quilt with 42 star blocks... and decided that using an alternate "empty" block was a much faster way to finish the quilt?!!


That's Jeanne Fetzer to the left, by the way - she was the lecturer and owner of all these quilts.  Lucky Jeanne!  Lucky us, that she likes sharing her bounty!  Here's a close-up of that lower border.  It's a mystery...
 
 
This particular quilt (below) had me thinking once again about something my friends and I decided when we saw the Legendary Quilts from France, last year.  I believe we are all just a bit too timid in our quilt making; we want everything to be exactly right, exactly perfect, exactly as planned.  But maybe, just maybe, once in a while we should relax... and do something crazy.  Okay - what am I talking about?  Look at the quilt.

 
It's a beauty - the blocks appear difficult to make, at first - but if you think about it, you can do what I like to call "deconstruct" the blocks and suddenly they do not appear so hard to make.  These are not a bunch of squares set on point... instead, look at them as a four-patch.... with pairs of triangles sewn onto each side... and then triangles added to the whole set, making it a square block.  Okay, that probably sounded really confusing but I think it would be an easy-to-make block.  Take a closer look, though and see if you can figure out what I mean.

 
But when you take a closer look... take a REALLY closer look.  THIS is what I mean when I say we are all a bit too timid (or at least I am):  when on earth would you ever make a two-inch square out of two or even three scraps?  Especially if the fabric was a stripe or a plaid?  Ha!  I just love the quirkiness of this piecing job!!!  And who would mix all these plaids and stripes.. and polkl dots?!!  Would you have the guts to do this?
 
 
One last quilt from Jeanne's lecture -- these are simple butterfly blocks from the 1930s.  We've all seen them or something like them.  What was funny, though, is what Jeanne said someone called them (and unfortunately I didn't catch who that was):  Roadkill Butterflies.  Too funny! 

 
So what else am I working on?  Not a lot, at least quilting-wise.  So I thought I'd show you just a few more things.  My friend Jerrianne E is making a Mary Mannakee quilt -- using just nine blocks.  Jerrianne loves cheddar as much or more than I do, and uses it a lot more than I do in place of reds and golds.  Her use of cheddar in these blocks is wonderful!  When she brought the quilt center to a bee, we ogled the blocks endlessly.  Her applique is superb.

 
And when a couple gals held up the blocks so I could take a better photo... we all oohed and aahed yet more!  Jerrianne is working on the border of this quilt -- it is going to be a blockbuster!

 
Another thing I wanted to show you is what my friend Marsha is working on.  She has my Afternoon Delight block-of-the-month - and to stay organized, she uses page-sleeves for each pattern, and for the finished block.  It's a great way to keep everything neatly in place.  I especially love that Marsha is using Thirties fabrics for her quilt, on a soft yellow print background.  This will be a most cheerful quilt when she's done with it.

 
I took a couple of days and quilted two quilts for my guild's annual auction.  The auction isn't until August of 2014... but at least these quilts are now behind me.  The tops were generously given to my friend Jerrianne by her hairdresser - his stepmother hand pieced them.  She donated them to the guild and I am quilting them because we all know that a top will bring in only about a third of what a finished quilt will bring in - at least in our guild's auction.  This first quilt is just a scrappy set of squares.  It's not a beauty - but who cares?  It's a wonderful utility quilt.

 
I quilted the quilt with just a random set of swirling feathers.  Here's one close-up... I love quilting feathers like this!  It softens an otherwise pretty garish quilt top.  There's nothing like getting a gal all dressed up (with formal feathers) to make her look good!

 
And here's a better close-up.  I used navy thread across the top of the quilt because it would "unite" all the scrappy squares in the quilt top.  When you quilt a quilt, do you ever think about using a non-traditional thread color?  Do... it can make a nice difference!

 
Another of the donated quilt tops was this Lemoyne Star.  You would not have believed how wrinkled and warped and wavy this whole quilt top was when I got it.  I feared the worst when I loaded it on my machine -- how could I ever get those uneven sashing strips and those wonky stars to behave?  Well... one thing I've learned by taking on the quilting of all these old quilts, is that blocks made with lots of bias cuts are a LOT easier to make lie flat than straight-pieced blocks cut on grain.  If a block can stretch out really crazy, it can be forced flat pretty easily.  So... the quilt actually ended up being wonderfully flat and even.
 
 
I had to laugh though... too timid?  In the choice of fabrics and use of cheddar as a background fabric?  This gal certainly wasn't in the least bit timid!  I also want you to note the quilting in this quilt.  It is very lightly quilted -- a quarter inch inside of each stitch line throughout the quilt top, plus a circle in the cornerstones to add visual interest.  Adding more quilting would have overwhelmed the quilt.  Sometimes "quilting the snot out of a quilt" is not the way to go... sometimes, simple is better.


Here's one more picture and a though before I close.  When I was cleaning off my desk, I came across this little drawing that I did several years ago -- representing the nursery song, "Rock-a-bye, Baby, in the tree top..."  I am thinking about doing a series of blocks for a quilt, each with a different childhood song appliqued.  What do you think about that as an idea for a new quilt design?  I'm working on it....


Last, but not least, someone asked a few months ago if I would talk about how I set goals.  At the time of year when we all have some sense that we should be making resolutions, making goals is a good thing to think about.  My goal setting is simple:  I am a list maker.  I make lists all the time -- usually on little index cards that I carry around and click off things as I get them done.  At the beginning of the year, I make long-term goals:  what do I want to accomplish this year?  The list includes household tasks, family tasks, quilting activities, yardwork, social activities, personal goals, etc.  If possible, I set timelines with these goals -- approximate points in the year when I think I can either begin working on as well as accomplish the goal.  I often note these on my calendar, with reminders -- so I know if I'm on track or not.  Doing all this keeps me focused - if I don't set goals like this, time escapes me and I can pitter away an entire day, week, or month with nothing to show for it.  This is not to say that I have to be busy all the time -- it's just that I love to get things "done!"  For the shorter term goals, I also make lists -- these are also done on index cards.  Often, I start with a list of the days of the week and then start filling in what I will work on each day... invariably, I don't get everything on the list done, as life has a way of interrupting the best-laid plans... but at least it's a way of waking up in the morning and not neglecting what I can knock off the list -- today's list had "finish blog, prepare guild budget template, mail packages, and clean out pantry" on it.  So far... I just have to go clean out the pantry and I'll be done!  That means I have free time tonight!!!  And it's NEW YEAR'S EVE!!!!
 
For all of you, I hope you have a wonderful New Year full of happiness, love, and good health.  I could probably wish for a lot more things for you, but if just those three things came, I'd be happy.
 
Best wishes for 2014 -- and happy quilting!
Sue
 
(c)2013 Susan H. Garman


Wednesday, November 27, 2013

November Thanksgiving and December Joy!


Yes, based on my attempts to always post on the first of each month... I am late in posting for November and early in posting for December.  I'm just glad that I'm finally sharing all the news and photos I've been setting aside for all of you.  October and November have been very, VERY busy months, keeping me tied down.  I gave you a sneak peak earlier; this was me in the middle of those six weeks - I have to say that at least I had a smile on my face...


And I survived! 

So let me go back in time.  After my October post, I hit the airport.  Where in the world is Waldo Sue?  I flew to Tampa, Florida, to do three (count 'em, three!) workshops and a lecture to a most unusual guild -- The Feather Princesses.


The Feather Princesses are unique in that the guild is applique only.  That's right - applique ONLY.  For someone like me, I thought I'd died and gone to heaven!  Of course, I still love piecing just as much, but to be surrounded by people who are not shunning the "A" word was terrific.  I was greeted in my hotel room with a basket of goodies which made me feel like... well, like a princess!


And then the next day, I got to meet the guild.  I had a terrific time -- they meet in a wonderful art center that provides them with meeting space AND a big storage room.  Wow!  I wish we were all that fortunate!


They meet once a month, starting early in the morning; they sew all morning and then break for a pot-luck lunch before their speaker (this month:  me!) provides them with a program.  It makes for a great day.  They have quite a few bees that meet during the month - they are a busy bunch of quilters!  This group is also unusual in that they do not elect officers every year.  Rather... the board stays onboard until one of them decides to drop off.... and then the board asks the "right" person to do the job of the one who dropped off.  It means they keep people on the board who are absolutely dedicated to their mission.  And one of the most energetic, enthusiastic, and wise members is President Dorothy Johnson -- a most remarkable woman!


I spent the week in Tampa teaching different workshops - and it impressed on my once again that students gain SO much more out of a workshop that is longer than one day.  Yes, I taught several different workshops, but having many of the students on 2, 3, or even 4 days meant that I got to know everyone better and help them more.  Next time you have the chance to take a two- or more-day workshop, do it!


Here is a gathering of the members at one of the workshops... I had such a great time with everyone!


At the same time, several members brought in quilts that they had been working on -- here are two shots of Afternoon Delight...


And one of the members brought in a quilt that she made - it needs to travel so that we can all see it.  This quilt was simply gorgeous; my photo did not do it justice., but luckily, the maker of this quilt - Sandi Snow - sent me her own photo (thanks!!!).  Isn't it fabulous???!


Here is a close-up of the face...


And the hands - note the detail in the flowers.  There is so much inking, painting, 3-dimensional stitching, and embroidery that make this quilt come to life, but at the same time, it is all very subtle and doesn't overwhelm the overall quilt.


Look at the border -- and the three-dimensional work there.  I could not stop ooh-ing and aah-ing over this quilt!


At the end of my stay in Tampa, the Feather Princesses proclaimed me an honorary princess.  I had a wonderful time - and hope that we can all learn from how this group assembles and organizes itself.


Next on the schedule once I got home was a trip to Athens.  No, not the Athens in Greece... Athens, Texas.  It's a 4-hour drive from home, but such a beautiful drive up to the woods and rolling hills in east Texas, where the GreenBriar Creative Retreat Center is nestled away off of a farm-to-market road.  It's actually in Eustace, between Athens and Canton.  Bette Jacob organized a retreat at this extraordinary center - it is beautifully decorated, offers some breathtaking views, warm hospitality, and modern amenities.  Best of all for us quilters, it has a large well-lit work room.  The focus of the retreat was teaching the quilters the temptress of piecing:  the feathered star.  Here is mine:


And here is the great workroom... with everyone hard at work...


And here is a wall with many of the feathered stars that were made at the workshop!


Below is sort of a "roll call" of stars... people chose different fabrics, different centers, different color values - they all amazed me!


Aren't they all just oh-so-stunning?  Seeing them all together makes me want to put together an entire quilt full of feathered stars.  That would be quite a task -- the fastest star takes me about six hours - and once I start fiddling with fabrics and other details, it can take quite a bit longer. 
 
One of the gals that took my feathered star workshop in Kerrville also sent me a picture of her finished feathered star.  It is hard to go wrong with this block; it is so beautiful.


As part of the GreenBriar retreat, I also did a short demo/workshop piece on twirly balls.  After all, why not have me teach some applique while I'm there?  Here was the project:  Red Twirly Balls.


I demonstrated my method of simple needle turn applique....


But there was someone at the retreat who showed ME how they do applique using freezer paper and starch.  She prepared her pieces, wrapping them around freezer paper and pressing them in place, and I was nothing short of amazed at how quickly she could do a twirly ball block!  Below is the block that amazed me - by Judy Green.  She made it in nothing flat - in fact, within a week, I was sent a picture of ALL the blocks, DONE!


So how does Judy do her work so well and so quickly?  She cuts a template out of a double layer of freezer paper, places the fabric on the shiny side of the freezer paper, and it adheres when pressed with a hot iron.. and then she takes the seam allowance and presses it around the template.  Once done, it's time to pop the freezer paper out and applique the units in place.  Voile - so simple!


 So how does she do it?  Well... you know those spice rack turntables you buy in the grocery store?  She uses one of those; she had her husband cut a piece of wood the size of the center circle, wrapped that silver pressing cloth around it... and it's ready to use.  Because it's on a turntable, it's easy to press your units without having to turn THEM - you just turn the turntable instead.


To keep the silver pressing cloth from becoming gummy with starch, Judy makes a small batting/muslin circle that she puts atop the turntable - and throws it in the wash when it is gummy.  I hope these pictures show you the tools and the process well enough.  I had taken a class by the incredible Jeanne Sullivan a few years ago, where she taught this method (you can learn more about it in her book, Simply Successful Applique - one of the best and most comprehensive books on the market for applique!), but a refresher course is always worthwhile.


At the same time, Judy was working on some blocks from Afternoon Delight - and I saw how effective the method was.


But if that isn't enough to convince you that this method is adaptable to just about any type of applique, take a look at Judy's Friends of Baltimore quilt - it won Best of Show in her guild's quilt show -- and she did ALL of the applique using this starch/freezer paper method!  Obviously, I'm going to have to go back and review the utility of my needle turn applique method.  There are only so many hours in the day, but already some friends and I are planning on bringing Judy to town to teach US how to do her style of applique.


While at the Greenbriar retreat, Rebecca Yarbrough showed us some of her diamond stars.  She uses another method for hand piecing -- English paper piecing.  Take a look at her stars - she is making tons more, but you can begin to see the "flowers" of stars, surrounded by stars with a paler background.


A number of us could not take our eyes off of the individual stars.  There is so much opportunity for fussy cutting the fabric and making each star particularly unique.  Take a look at a few....


Here is the back of one of the stars - you can see how the fabric is so neatly pulled around the paper templates on the outside diamonds - and how the templates have been removed from the inside diamonds.  Again... this is a piecing method that I need to look at adopting!  I'll say more about that later in this post.


See how neat the center seam allowance gathering is?  Once pressed, it will lie flatter than a pancake.


While at the Greenbriar, we had a treat because the quilt guild over in Canton was hosting their Texas Star Quilt Show.  Who could resist?  Road trip for all!  Here was their Best of Show quilt.  The quilt pattern is from Thimbleberries.  The quilt was made by Gerri Kyser of Wills Point, Texas, and quilted by Karen Denney of Murchison, Texas.


Part of what made this quilt so beautiful was the quilting - it was exquisite.


Here's more... (notice the flowers quilted into the pebble quilting)


And more... (notice the stems/leaves quilted into the top creamy units - they outlined the printed design on the fabric, which is a great way to quilt something!)


And more....


And more...  Gerri Kyser's piecing is wonderful and Karen Denney's quilting rocks!


Over the River, made by Mary Waddill and quilted by Karen Denney, was another beauty.


This quilt won a merit award for machine quilting -- you can see why in the photo below.  Also, note the use of both navy and brown embroidery floss -- that adds a special look to the embroidery work; I love it!


The quilt below, Hearts Abloom, was made and quilted by Cindy Stowe. 


The quilting on this quilt was all done on a longarm - and was totally hand-guided.  It added such a beautiful touch, particularly since it was done with red thread on a black background.


Somehow I missed getting a picture of this entire quilt, so I only have a close-up of the block... an old wedding ring quilt.  I love the quilting in it - it was done by David Denney -- remember Karen Denney's quilting in the best of show quilt?  This is her husband's work!


The Quilt won a second place ribbon.  It was exhibited by Sue Elmblad; her great grandmother had made the quilt, and then it sat in her grandmother's cedar chest for many years until her mother gave it to her.  The quilt is believed to have been made between 1910 and 1920 - and finally, it sees the light of day when finished.  There is a lesson in there for all of us.  Look at the delightful binding on this quilt, below... I love it!
 

 I loved some of the signs that hung in the quilt show... a cute reminder to keep our hands off the quilts!


The show honored a quilter from an earlier generation by hanging this quilt.  The quilt now belongs to Sarah Jennings Macy of Edgewood, who inherited it from her great aunt and namesake, Sarah C. Jennings.  The quilt was pieced by the first Sarah Jennings when she was 16 years old (1868).  It was quilted almost sixty years later in the Iowa sesquicentennial year (1926); the maker reportedly did much of the hand quilting herself. 


Below is a photo of the young quilt maker, Sarah Jennings - and another photo of the great niece that inherited the quilt.  Sarah C. Jennings was the second of seven children born to Samuel and Mary Jane Jennings.  The family was one of the first settlers of Bremer County, Iowa.  Sarah never married and lived on the family farm her entire life.  Family rumor says that she met and fell in love with a traveling salesman but he left her heartbroken.  She died at the age of 97.  The quilt has never been used and remains a treasured piece of the Jennings heritage.  What a wonderful story! 


Once I left Athens behind, I headed home to Friendswood, and prepared for the big quilt show in Houston.  See this building below?  It's the George Brown Convention Center.  Yes, that building extends for more than a block.... and it has NOTHING in it except quilts and quilt-related items for over a week.  Is this heaven or what?!!  I took this picture from my hotel room window -- it is extremely difficult to get a room at this hotel and you have to call a year ahead of time or you're out of luck.  Fortunately, I had a room... and I already have one for next year!  It's a treat, but worth it because there is an enclosed walkway over to the convention center, eliminating any concerns about weather. 


The highlight of my first night was... the Winners Circle!


I received a third place ribbon for Twirly Balls and Pinwheels  - such an honor among the quilt stars of the world!

I won't post photos of all the wonderful quilts at the show -- I'll save that for a future post... but just to give you an idea of the size of this place, here is the food court, below.  Actually, it's only a quarter of the food court.  The International Quilt Association's show is the LARGEST convention in Houston all year -- larger than what used to be the giant of conventions, the Offshore Technology Conference (after all, we ARE in Houston!).  Over 50,000 people head to Houston for this quilt show - and it is worth every second that you can be there.


One of the treats for me is to meet other quilters that I only get to see once a year.  Here is one that I always enjoy seeing and talking to:  Pat Sloan.

 
Pat is a wonderful quilt designer, teacher, fabric designer, and more.  She is just a treat to be around - so full of energy and fun!  Pat does a regular podcast (think "radio interview via the internet") every week, where she interviews a quilter and asks all kinds of questions about what they do, how they do it, why they do it, tips, and more.  It's a fun and interesting broadcast that you can listen to on your computer or subscribe to by iTunes (search American Patchwork & Quilting).  Click on this link (after you finish reading my blog post!) and scroll down and choose which interviews you want to listen to and click on the Play button:  http://www.allpeoplequilt.com/magazines-more/quilting-podcast And here's some breaking news:


Pat is going to interview ME on December 16th!  Stay tuned... I'll send out a reminder the week of the podcast.
 
Another person I got to spend some time talking to was Pearl Pereira.  If you don't know who Pearl is, you just haven't been paying attention; she has designed some of the most phenomenal quilts.  The one below, Happy Trails , is her newest design, and it is a knockout!  In general I never make other people's quilts -- I love them, but I simply do not have time when so many of my own quilts are screaming at me to be finished.  This one, though... it snatched my heart and I have ordered it.  I know exactly where I will put this quilt when I finish it -- my daughter's ranch.  If you want one of these quilts, go to Pearl's website at www.p3designs.com, where you can order your own... or one of her many other patterns.  
 

Pearl uses the starch and freezer paper method too - though it is slightly different than Judy Green's method, above.  Nonetheless, if I ever have the opportunity to take a class from Pearl... I'll rush to be first in line! 

While at the Houston quilt show, I also had the opportunity to talk to Alex Anderson and Ricky Tims.  They and their partners are such warm and genuine folk.  The Quilt Show, which they all run, is a wonderful online quilt community, and each year it offers a new block-of-the-month to online members.  At the Houston show, the 2014 quilt was unveiled -- an alphabet quilt by Janet Stone.  I'll show more pictures of it when I show the pictures from the Houston show in a month or so -- the minute details included in Janet's quilt make it sparkle and put a smile on your face!


Here's a close-up of the infamous "TQS" letters in the quilt - conveniently positioned so that you could read them as "TQS".


Another person that I had the joy of meeting for the first time was Sue Daley.  She is a fabric designer, teacher, quilt designer... and has a real flair for English paper piecing. 

 
Below is one of her patterns -- they are all so charming!  In fact, Sue charmed me so much... that I ended up buying some clamshell templates as well as some diamond templates.  I think I might become hooked on English paper piecing -- as well as freezer paper and starch method of applique.  I never would have imagined it before, as I'm pretty set in my ways, but I believe there are always ways we can learn and improve on our work.  Now, please, don't any of you worry - I will still keep designing in my own style - these tools and techniques just add a new dimension to my work (note to self:  don't fall for trying out fused piecing; it's definitely NOT your gig!).
 

Another thing that I did while I was at the Houston quilt show was to scour the booths with antique quilts in them for ideas.  I have always maintained that antique quilts that remain appealing to us today have stood the test of time and are worthy of study and adaptation.  One of the vendors, Pique' Trouver (pronounced pea-kay true-vay) was new to me, but they had some stunning quilts.  Below is one of them -- a set of Seven Sisters blocks in a medallion array.  It's hard to imagine the amount of hand work that went into putting all of these pieces together.  I wonder if they used English paper piecing?


Here is a close-up of the border of this quilt; see how the diamond motif was carried through in it.


And here is yet another quilt that was in the Pique booth, that used the Seven Sisters block.  This quilt maker chose a different layout that saved her a ton of time because there are far fewer blocks in it!


There were so many more antique quilts to see; these are always a highlight of going to such a large quilt show.  I liked this appliqued tree, below -- it was a single block, surrounded by some quirky amoeba-like red and white blocks! 


And here was a stack of quilts on a table... these two both caught my eye...


And we asked the vendor to show us one of them.  It's a simple framed nine-patch -- such a simple design, but such an effective use of scraps!


This quilt, hanging from a hoop at the top of the booth, also caught my eye.  I love red and green quilts, and this was nothing more than red leaves and green leaves appliqued onto a white background and framed in half-square triangles.  Sometimes the simplest designs can be the most eye-catching.  I might add, though... I have always been told that if you enter a quilt into a show and want it to get the attention of the judges and the viewers, "quilt the snot out of it!"  Here is an example of how quilting can lift a quilt out of the doldrums into a new level!


The Quilt Complex, co-owned by Julie Silber and Jean Demeter, had a booth at the Houston show.  Their quilts were all so very striking and unusual.  Check these out...


The above quilt uses two simple blocks and a swag/bow border.  But it is such an effective combination!  Here is a close-up of the compass block.


And here is a close-up of the cutwork block.  Note the exceptional quilting showing in both of these photos.

 
 Another booth I love to visit is Carolyn and Don Springer's Quilts from Mulberry Lane.  They collect the most unusual quilts I have seen, as Carolyn favors "quirky things" in her quilts.  Here are a few of the quilts I saw in their booth.  The first one is a feathered star quilt.  Note that the "feathers" are done in the background fabric color, which becomes a problem at the tip of the stars, so the quilter reverses her color scheme... as shown in the picture below this one. 
 

It's so fun to see how quilters from over a century ago adapted patterns to suit their fancy!


This quilt is a silk honeycomb mosaic and just stops me cold every time I see it.  It is SO elegant!  The border, in particular, is phenomenal.


There were tons more quilts in their booth -- including these, hanging from the top of the booth... and one of them caught my eye.


Well, actually, they ALL caught my eye, but one in particular did - a red and green princess feather quilt.  I have always had a fondness for princess feather quilts - and knowing Carolyn and Don, there was a story behind this quilt.  Can you figure out what makes this quilt so unique? 

 
Have you figured it out?  The princess feathers twirl in different directions!  I loved this quilt.  Especially the trapunto hearts that sit on the mid-side and corners of the quilt.  When I say I love something (with respect to quilts), that usually means that I'm going to make it or use it as an inspiration for my own pattern... but with this quilt... aw heck.  I bought it and took it home!  I have a spot on my 20-foot high living room wall, that needs a quilt... I have been looking for the perfect quilt for five years... and now I just need to find the perfect man to hang it for me!  No, that will not be my husband -- he's not allowed on ladders, even though he's perfect in every other way.
 
Here's another quilt that caught my eye - the piecing and the "busy-ness" of the fabrics in the Double Hourglass blocks kept my eyes dancing across the face of the quilt.  What made it all the more unusual (remember: they like quirky quilts!) is that the blocks are different sizes!  Take a look at this picture.... can you see the diagonal rows of blocks that are one size... but they line up against another row of another size.  I wondered why...


And then I suspected that I might have an answer.  Take a look at this shot.  Can you see how the blocks with the lighter brown/cream squares are smaller than all the blocks with the grayish/cream squares?  And how that line of squares runs diagonally across the corner of the quilt?

 
Here is what I suspect.  The quilter made a quilt of smaller blocks.  It was not set on point.  Then... she had another quilt of larger blocks.  She took that quilt with larger blocks apart, first splitting it in the middle, and then splitting the two halves diagonally... giving her four large triangles.  She added those triangles to the sides of her smaller square quilt, which set it on point!  I think you might be able to see that in this photo.  The quilt, by the way, came from an estate in Maine and was made in the 1830-1850 timeframe.


You all know by know that I love red and green quilts.  This one was no exception.  Take a look at it...


It's a fairly simple quilt - but what made it so unique to me was the set of flowers with little circles and spots around them. 


Too cute, I say!


Here's another shot of them... notice how the different greens have changed over time.


And the use of cheddar, for me, is just a bonus!


Okay - so much for the Houston quilt show.  Here are a few more quilts.  This one is a photo of a quilt sent to me by its maker, Dawn Larsen.  She made the quilt based on my Washington Medallion pattern and modified it to make it a rectangular quilt.  It looks wonderful - in fact, it looked so wonderful that it won a ribbon in the American Quilters Society show in Phoenix earlier this year.  You rock, Dawn!

 
 Part of what made this quilt a standout among others was the exquisite quilting in it.  Check it out, below.  Remember that tip I got about "quilting the snot out of a quilt"?  Well... the proof is in the pudding!


Once the Houston quilt show was really behind me, my family headed out west to my daughter's ranch.  I'll show you a few photos here -- just so you can see that quilts DO look nice in any style of home, including a warm and cozy ranch house.  Here is an oak leaf and reel quilt that my daughter bought at my guild's annual auction a few years ago.


I had forgotten how nice that block looks with lots of room to breathe around it!  The quilt is actually red and white - the lamps in the room at dusk just made it all appear yellow.


That quilt reminded me of another quilt that went into my guild's option -- and again, giving a set of quilt blocks plenty of room to "breathe" adds a softening touch.  Here's the younger quilt... which I also quilted.


And here's a closeup....


And another close-up.  Remember... quilt the snot out of it? It's true.  At least to some extent.  I think you honestly CAN over-quilt a quilt.  You have to use a little judgment when deciding how a quilt is to be quilted.


Here's another set of ranch beds....  quilts really add warmth to a home, don't they?


When my guild met earlier this month, one of the gals there was tickled to show me her finished Amish quilt.  Why was she so delighted?  Because I had made the quilt, marked it, quilted about a quarter of it, and let it sit for 20 years.  I finally decided to dump the guilt... and the quilt... and put it in my guild's auction in August. 

Well... the quilter who picked up this quilt in the auction finished quilting it - it's DONE!  And that is great news.


Here's another story about a quilt that I felt was worthy of sharing.  Faye B emailed me and asked for some thoughts on paying for quilting a guild's raffle (opportunity) quilt.  My answer was:  our guild debated the issue several years ago and decided it was unfair to ask a "professional" to donate 30-40 hours for free, so we pay the quilter... and often the quilter will either reduce the price or donate her time for free... but it is not an expectation.  We ask the person we believe will do the best job on the quilt, to quilt it - we don't go out and seek the lowest bid.  Well... Faye thanked me, and then told me a story.  She said that her son has asked for a new quilt for each deployment... and as his mother, she naturally is happy to comply.  After one trip to sea, he came home to a newborn and Faye flew out to California to welcome both her son and his family.  As she prepared for a night on the sofa, he came out with a quilt in his arms, and apologized for its condition.  To this day, his words remain written on her heart:  "Momma, this quilt went through the ship's laundry too many times, but I wrapped myself in it every night, knowing that my momma loves me..."  Her quilt, based on my Southern Beauty pattern, below, was what he had slept under while at sea.


As Faye said to me, "Sometimes we quilt for show or "opportunity" ... but sometimes we just quilt with our hearts."  So true, so true, Faye.  Thanks for your insight.

So what have I been working on (and have I worn you out yet?  Now do you know why I couldn't finish my blog on November 1st?!!)?  Here are a few of the things that have been part of my spare time.  First of all, I was starting to panic when I went up to east Texas... I was totally void of any handwork project to take along!  I sat down the night before I left, drew out some template designs, marked some fabric, and have started making these blocks out of blue and cheddar fabrics.  Right now, my thought is to make a nine-block quilt, but I've not totally settled on that.  You'll likely see more of these next month (January 1, 2014).  Some of the pieces are still basted in place and not sewn down - and we had so much fun trying to name the blocks -- from "Bird Poop" (well, it kinda DID remind me of a big Splat!) to "Rick Rack"  and lots more names to... the final choice, "Target Practice."


Then... remember this quilt that I saw at last year's quilt show, in a booth?  The one that I loved?  I told you that if I love an old quilt, it generally means I would like to make my own adaptation of it. 


And so I not only made my own version of it -- I finished my own version!  I'm proud to present "Grace's Alphabet."


Here's a close-up of some of the blocks - and the quilting on them.  This is a case where over-quilting would NOT fit with the quilt design -- it would make the quilt appear heavy.  I liked doing 2-inch cross-hatching and simple circles in the sashing, as it is "light" enough to not bury the quilt in quilting.


The back of the quilt is made of two lengths of fabric sewn together... with a sweet 1930s era "alphabet" fabric.  It was a nice find in my stash and I only wish I had more of it - but sometimes less is more.  By the way... the pattern for this quilt is now available on my new website, www.ComeQuilt.com.  Yes, it's up and running!


I finally, finally managed to get back to the Baltimore blocks I was working on.  Here you can see the beginnings of the block and a picture of the design (reduced size).  It's coming along.  But wait, wait, what's wrong here?  The block and the picture don't match!  Why not?  Because the photo is of an on-point block and the quilt is a straight-set block.  This Baltimore quilt is going to have two options:  one set of blocks that are made to be set on point and another set of blocks designed to be set straight.  It's twice as much work and definitely a case of biting off more than I could chew... but things are settling into place after a few months of chaos in my household.  I'm keeping my fingers crossed that things stay settled down, too!


I've started on the vase for this block... here's the freezer paper template that I made for marking the fabric...


And here you can see that I've started doing the applique.  In fact, as I type, it is sitting beside me, waiting to be put onto the block, itself.  Hooray for progress!


What else is going on in my world?  The Applique Away on Galveston Bay retreat is going to kick off in February, so I've been cutting fabric and assembling kits for one of the two-day workshops, "The Glorious Eagle."


And I'm putting the final touches on the pattern for the other 2-day workshop, which is for the quilt below.  If you want to know more about this retreat, you can check it out at www.appliqueawayongalvestonbay.com .


Certainly not the least of the stressors in my life, was getting my new website up and running.  Yes, Come Quilt is alive and well and I am so very thankful for the support I have gotten from everyone who has ordered from me, given me feedback, provided information... I could never have done this without the help of a ton of people.  THANK YOU!!!!


Part of the joy of getting the website up and running was realizing that I needed to update a lot of my patterns.  Some of them had fallen by the wayside, some of them had gotten lost in history, some of them were not well presented before -- and all of this has opened my eyes and given me a wonderful opportunity to improve the patterns, improve the marketing, and improve the interface between me and the customer.  I am open to continued suggestions for improvement!

Here is an example of a quilt that I have always loved but seems to have gotten lost in the fray -  The Washingtonian.  It's a large quilt - the center blocks are 24 inches (finished size) and the finished quilt is 79 inches square.  Because the blocks are so large, they are easy to make.


Here's a close-up of the border:


And a close-up of one of the blocks; these are all based on Victorian ceiling tiles!

 
Can you believe that you are at the end of this blog?  I mean... this has been a LOT of reading and scrolling to go through; I hope you haven't gotten totally worn out and feel like you got a special treat.  Just think, though:  there was so much here that you can easily use the rest of the Thanksgiving weekend to go back and peruse over everything once again. 
 
As for me... I'm going to head off to the ranch after turkey day, and work on my Baltimore blocks... and think about the best way to tackle both starch/freezer paper applique and English paper piecing.  I'm kind of excited about learning a new technique!  Also, there may be some new things coming your way, soon, so stay tuned.  And don't forget:
To all of you, I wish the best Thanksgiving ever, with friends and family, a bounty of blessings, and good cheer.
 
Happy quilting -
Sue Garman
 
(c)2013 Susan H. Garman